POD Jr 3k/7k heater | GSW Hot Blast heater | Bunsen Auto Motor Heater instructions
POD Jr 3k/7k heater
POD Jr - 3k/7k Heater
The small POD heaters made in Sweden were perhaps the best-built small heaters ever made. The workmanship and materials used were outstanding and the theoretical design work yielded a very clean burning heat.
As Sweden is not a member of NATO, the distribution of the military model 3k/7k heater was confined to Nordic nations and they are rare indeed. My POD 7K was made in 1981. The basic font, gallery and wick were used in many commercial small POD heaters, including the models Jr, 2, 2K, 5K, 7K, 61, 62, 62K, 65, 76K, "Ge-H" & Top. The "Ge-H" was an interesting design using a stainless steel top with a provision for venting and a sealed font to prevent fuel sloshing for use heating the cabins of small sail boats.
POD may still manufacture the POD 8K/SEL heater, a larger heater which could best be described as what an Aladdin Blue flame heater would be if updated. I stock wicks for both POD heaters. |
|
|


Both the small POD and POD 8K/SEL are flame spreader designs, and the last flame spreader heaters to be manufactured by anyone.
POD has been making heaters since the 1950's and their experience and expertise is accepted worldwide. The 8K/SEL is apparently still in production, but that is not certain. The smaller, marine-intended "Ge-H" heater may also be in production. It is impossible to provide any definitive information on POD heaters because they do not appear to have a dealer/distributor system, do not advertise, have never had a website, etc. Their marketing strategy seems to be to produce heaters in secret and hope that word-of-mouth "advertising" will suffice to sell their heaters.
Some listings for POD heaters for sale are below.
http://www.skytech.se/index_eng.htm
http://www.alibaba.com/product-free/114352260/POD_8K_Kerosene_Heater.html
The small POD 7K shown at right is their military model, apparently made as a "tent heater," similar in concept to the Turm L51 used by German, Swiss and Austrian armed forces. The markings on the silver label shown at right are: POD M2842-062010 VATENFILTERVARMARE M8240-102010 |
|

POD 7K With Cover Removed
The "chimney" for draft control extends to within 1 1/4" of the top of the protective screened cover. The heat is contained within the chimney. The circular screen cage has a clearance of 1 3/4" all around from the hot chimney, allowing a substantial passage of air through the screen. The result is a "touching" temperature cool enough not to burn fingers or clothing. Indeed this heater could be safely used in a tent with reasonable care. |
|

The POD Wick and Wick Carrier
At right is the wick sleeve from the POD 7K heater with a new wick installed. Note the split in the wick is aligned with the gear slots in the sleeve, and the seam is split up to the base of the wick sleeve. Install the wick with 1 1/4 in. (31mm) exposed above wick sleeve to get the correct wick height for burning. |
|

The wick sleeve is identical to the Valor W44 wick sleeve but the Valor wick is cardboard-backed and too thick to fit over the POD center draft tube. If you have a small POD heater missing the wick sleeve, the W44 wick sleeve can be used with a POD Jr. wick to get the heater back into operation.
Getting ready to burn a new wick level
The photo at right shows the new wick installed and the gallery replaced. At this point the wick is lowered into the wick gap and a couple of teaspoons of alcohol carefully poured on the top of the wick. The wick is then raised as shown so that 1/8" or so of wick is exposed. The flame spreader is in place. The wick is then lighted and the chimney replaced. The alcohol will burn, then burn the wick itself down level with the wick tubes. At that point the wick will be perfectly level on top and burn without producing any flame spikes. |
(See the label translation from Swedish to English below.) |

The POD heater is now ready to use. Fill with pure, clear kerosene ("paraffin"), wait a half hour, then light the wick. Replace the chimney and the protective screen. The heater will then produce approximately 4,000 BTU/hr with a medium wick height setting.
More general instructions for using the POD heater can be found in the owner's manual for a Valor Parlor Heater.
|
|
POD 8K/SEL | POD "Ge-H" |

Translating the label on the POD 3k/7k military model:
Translating the labels on a POD 3k/7k military heater was begun by Peter Brickell. The initial translation was from Dr. Terry Biddleman. The translation and comments in red were kindly provided by Olle Nygren to Peter Brickell for us to understand the directions on the POD 3k/7k heater. Miles Stair
POD labels translation
(English underneath in italics)
Fr hg, normal, Fr lg instllning.
Too high, normal, too low setting.
Brinsle: Tillse vid pfyllning at ni alltid anvnder ren fotogen 24. Anvnd aldrig en brinnande vattenfiltervrmare.
Brinsle?: Make sure when filling that you always use clean kerosene #24. Never fill a burning water filter heater.
Tndning: Lt veken suga up fotogenen i ca. 10 min. Innan vattenfiltervrmaren frsta gng skall anvndas, vrid drefter upp veken 3-4 mm och tnd s, att lgen sprider sig runt vekens kant. Drefter justeras lgen med hjlp av ratten till nskad effekt (storlek). Tillse alltid att lgen r helt bl.
Ignition: Let the wick draw up the kerosene in ca. 10 min. Before the water filter heater is used for the first time, turn up the wick 3-4 mm and light so that the flame spreads around the wick edge. Then adjust the flame by the wheel to the desired effect (size). Always ensure that the flame is completely blue.
Sktsel: Veken mste vid behov putsas. Detta sker med tillhrande renskniven som anbringas p centrumrret sedan veken skruvats i bottenlge och centrumhuven borttagits. Drefter skruvas veken ter upp till den nr kniven, varefter kniven vrides runt tills de lsa kolpartiklarna avlgsnats.
Maintenance: The wick must, if necessary, be trimmed. This is done with accompanying knife that is attached to the center pipe. Screwed the wick to the bottom position and remove the central hood. Then screw the wick up again until it reaches the knife. Turn the knife around until the loose carbon particles are removed.
Vekbyte: Nr veken fullt uppskruvad ej lngre ger full bl lga r den frbrukad och mste bytas. Tag bort skorsten och centrumhuv, skruva av brnnarhuset med den medfljande nyckeln, vrid upp veken s lngt, att denna svl som vekhylsan kan lossas frn centrumrret. Tag den nya originalveken, till vilken alltid vekhylsa medfljer, och stt den p centrumrret, s att kugghjulet griper in i hlraden p vekhylsan. Vrid drefter ned veken, stt p brnnerhus och centrumhuv och vatterfiltervrmaren r klar att tndas.
Changing the wick: When the wick fully turned up no longer provides a full blue flame, it is consumed and must be replaced. Remove the chimney and central hood, unscrew the burner with the key provided, turn up the wick far enough that the wick carrier can be detached from the center tube. Take the new original wick, which is supplied with the wick carrier, and place it on the center of the pipe so that the pinion engages the punches in the wick carrier. Then turn down the wick, put on burner housing and central hood and the water filter heater is ready to ignite.
Observera. Endast fr uppvrmning av vattenfilter 1000 L/H. Frbud mot annan anvndning.
Please note. Only for heating water filters 1000 L / H. Other use prohibited.
GSW Hot Blast heater
GSW Hot Blast Heater
General Sheet Metal Works (GSW) of Hamilton, Ontario, Canada sold the "GSW Hot Blast Heater" apparently in the 1960's. There were also electric hot water heaters and even GSW brand Beacon cold-blast lanterns sold. GSW may not have actually manufactured the GSW Hot Blast Heater but rather had them made for them - the "shield" logo in the cut-out upper ventilation holes and cheap spray-painted branding below the heater name was definitely an identifying mark of GSW. GSW did sell the heaters through large discount stores in Eastern Canada, including Toronto. I have found no evidence the heater was exported to the US.
In fact, I can see no evidence whatever that GSW or anyone else ever lighted one of their Hot Blast Heaters prior to selling them! The heaters absolutely would not work properly as sold. Air could enter the metal "chimney" section of the heater cabinet with the effect of reducing the flow of oxygen to the wicks. No matter how one tried or the fuel used, they burned incredibly sooty and smelly. The soft, thick black house paint used on the top and bottom plates would begin smelling as soon as it warmed up, the fumes being noxious and voluminous. With the smell and soot produced, they were quickly relegated to storage. A good friend of mine in Toronto found two GSW Hot Blast Heaters in virtually new condition, fuel from the original burn still in the tank...and absolutely coated with a thick layer of black soot.
The design and construction of the GSW Hot Blast heater is entirely wrong. It could never have worked as designed. Whoever did the basic construction knew absolutely nothing about heaters, the function of blaze cones, how to get air to the wick for proper combustion, or even how to paint a heater. It was a total disaster that could not even have been tested once before being sold. They are cute, but function must come before form in a product being sold for a specific purpose. Photo at right shows the heater as originally sold. |
|

`
The most pressing fundamental problem with the GSW Hot Blast Heater is the row of ventilation holes in the base of the metal chimney section. Those holes allow the entry of oxygen above the blaze cones. In the photo at right you can see the row of ventilation holes at the base of the brown metal "chimney" section. Those holes must be covered from the inside to prevent any air from entering at that location. I used 3M High Temperature Flue Tape, Pn 2113NA, True Value Hardware Pn 387806. The tape is 1 1/2" wide but it need be only 3/4" wide, so I cut it in half lengthwise and applied the tape on the inside. |
|

The photo at right shows the completely re-engineered draft system. Air is forced to enter through the ventilation holes in the plate with the blaze cones, the air having no choice but to pass on each side of the wick, thus providing sufficient oxygen to allow at least a reasonable chance to burn relatively cleanly. If you expand the photo by clicking on it you can see the silver aluminum Flue Tape showing through the ventilation holes in the brown chimney section. On the black lower portion you can see the reflection of flame generated by the wicks beneath the blaze cones - where oxygen is supposed to flow to ensure good combustion. |
|

The proper thick, 4" wide wicks for the GSW Hot Blast Heater are here.
At right is a photo of the GSW burners and fuel tank. This is what is directly underneath the photo above. The straight, 4" wide flat wicks and wick raising gears are directly from 1880's technology as used in sad iron stoves. When adopted for the GSW it had already been obsolete for heater use for over 70 years! As early as the late 1880's, Miller, Cleveland Stove, B&H, and others were producing clean burning center draft heaters using circular wicks adapted from Victorian Era "store lamps." |
|

The photos at right show the two parts which needed to be completely stripped of all original paint residue. Two (2) applications of modern new OSHA, FDA and EPA approved, non-threatening, non-toxic, liberal, politically correct, environmentally friendly tree-hugging paint remover did actually remove about 90% of the cruddy black low temperature paint. Hand sanding removed the remaining paint. |
|
|


At right are the component parts of the GSW Hot Blast Heater after painting with high temperature auto engine block paint. Only two bolts secure the top and bottom plates to the metal chimney, and one bolt acts as a hinge pin to secure the top assembly to the base with tank and burners attached, so it is extremely easy to separate the component parts for refinishing. |
|

The refurbished GSW Hot Blast Heater will never burn as clean as a modern kerosene heater - the basic design concept of two 4" wide flat wick prohibits that. But the GSW is still very useful as a greenhouse or shop heater where the mild fumes produced do no more harm than annoy spiders and bugs. |
|

Bunsen Auto Motor Heater instructions
AUTO MOTOR HEATER INSTRUCTIONS
(Bunsen-Davy Motor Heater Below)
(Bunsen Sports Heater Below)
| From the 1940's through the 1960's, "Sports Heater Company" of Denver produced little kerosene heaters to heat engine blocks during cold weather. The auto motor heaters were sold under a wide variety of names, but I suspect Bunsen in Denver actually made them all. Used properly, these little heaters can be used to heat a greenhouse, pump house or small building. Over time, the instructions for how to use these heaters became lost, but the auto motor heaters themselves can often be found at garage sales and on eBay. So, I give you the original instructions that came with the heaters. Instead of scanning the 6 point type on the instructions, I have typed them...at least they will be readable. Click on the images to see a larger version. |
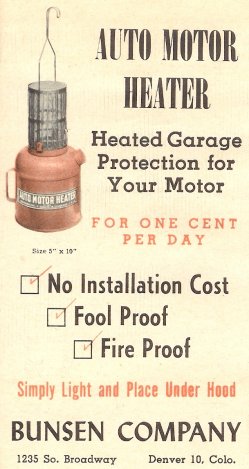
Below the factory instructions are my notes - they are important!
| UNPACKING: After unpacking, remove screen (#10) by turning to right. Fasten bail or hanger (#9) in eyelets on screen retainer (#3). Fill with best grade water white kerosene to 1/2" below filler cap (#2). LIGHTING: At each lighting, remove screen (#10). Apply one tablespoon full of denatured alcohol to Primer Wick (#6). Replace screen (#10) and light by inserting match in lighting gate (#5). Kerosene can be used for priming (if alcohol is unavailable). IF kerosene is used, the primer wick must be lit with Screen (#10) off and Screen MUST NOT BE REPLACED until primer wick is entirely BURNED OUT. ADJUSTING FLAME: After priming alcohol has burned off, adjust flame by opening filler cap (#2) until flame rises just over the round baffle on top of inner shell (#8). Flame adjustment is controlled by quantity of air passing thru holes in filler cap (#2). When flame is properly adjusted, mark filler cap so that future adjustments can be made instantly. |
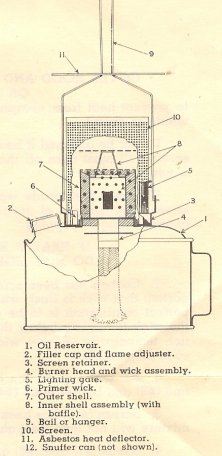
PLACING HEATER IN CAR: Attach asbestos sheet (#11) by slipping over hook of bail (#9). Hang heater to cross bar under hood if convenient. If not, place in LEVEL position.
TO EXTINGUISH: Remove heater and place snuffer can over screen (#10). Leave snuffer can on screen until next lighting.
TO REPLACE WICK: If wick becomes carbonized, remove screen (#10), inner shell (#8), and outer shell (#7). Remove wick assembly by lifting out burner head (#4). Loosen hard carbon on wick by scratching with pointed instrument. This will lengthen life of wick temporarily. THE TOP OF THE WICK SHOULD BE FLUSH WITH WICK CONTAINER TUBE AT ALL TIMES. If wick cannot be brought up flush with wick container tube, we recommend purchase of a new wick.
TO USE AS EMERGENCY ROAD FLARE: Remove screen (#10) and inner shell assembly (#8),. Light center wick.
KEEP HEATER UPRIGHT AT ALL TIMES
CAUTION: If kerosene splashes thru burner head and soaks primer wick the heater will smoke and soot up. (If primer wick should get soaked with kerosene, remove screen, light primer wick and allow it to burn completely out.) Screen must be free of soot at all times.
If screen is punctured in any way, the burner is not fireproof until screen is replaced with new one.
DO NOT ALLOW HEATER TO BURN COMPLETELY OUT OF FUEL. THIS ACTUALLY BURNS THE WICK, DESTROYING IT OR SHORTENING ITS LIFE.
COVER HOOD AND RADIATOR WITH BLANKET OR TARPAULIN to prevent heat from escaping. (You can't heat a room with the windows open.)
Do not be alarmed if heater smokes on first burning. The preserving oil must burn off the screen, lasts only two minutes and is non-recurring.
IF HEATER BURNS IMPROPERLY, DO NOT LIGHT IT AGAIN UNTIL:
1. Carbon has been scraped from wick (#4). It is vitally important that wick is flush with opening in metal wick container if perfect combustion is to be obtained. If in scraping the carbon the wick is slightly below the wick container, the unit will function temporarily. A new wick assembly should be installed as soon as possible.
2. All soot and carbon have been removed from shells (#7) and (#8) and burner head (#4).
3. Screen (#10) has been thoroughly cleaned. (The proper air mixture will not feed through a dirty screen.)
4. Shells (#7) and (#8) are properly seated.
THEN LIGHT AND THE HEATER IS AS GOOD AS NEW
TO ASSEMBLE BURNER HEAD
1. Insert Wick assembly (#4) in Oil Reservoir (#1).
2. Seat Outer Shell (#7).
3. Seat Inner Shell Assembly (#8).
NOTES FROM MILES STAIR
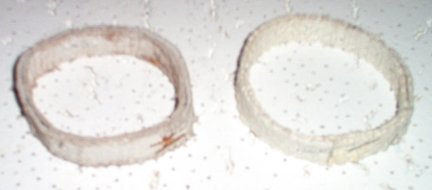
The Primer Wick (#4) mentioned above. The one pictured above left is an original factory replacement, two thin strips of asbestos stapled together at the ends forming a circle approximately 2 1/2" in diameter using 7 1/2" strips of asbestos. The Primer Wick on the right I made using thicker and stronger asbestos. Nothing other than asbestos will work for this job, as asbestos is an absorbent mineral and will not burn. Asbestos dust can be hazardous to your health, so handle carefully.
| Auto Motor Primer Wick, asbestos. I take no responsibility for the use of asbestos wicks. | Order on WickShop.com | |
| Auto Motor Heater Wick, cotton. 3/4" x 8". Cut in half it makes two wicks with trim-to length of 4" | Order on WickShop.com |
If you see an Auto Motor Heater for the first time, it looks just like an oversize metal lamp with a weird screened chimney. In fact, Auto Motor Heaters DO NOT operate like a kerosene lamp! The actual design function is for the burner head and inner shell assembly to be preheated with alcohol from the primer wick, and then the Auto Motor Heater will operate more like a pressure stove, drawing fuel from the wick, but not actually burning the wick. The primer wick is an essential part of the operation of an Auto Motor Heater. Without the primer wick and preheating with alcohol, they are an inefficient, smoky device that does not produce much heat.
The Asbestos Heat Deflector (#11 above) was not available from the factory after the 1950's, and is almost never found today. Keep the heater at least one foot below any painted surfaces or anything combustible.
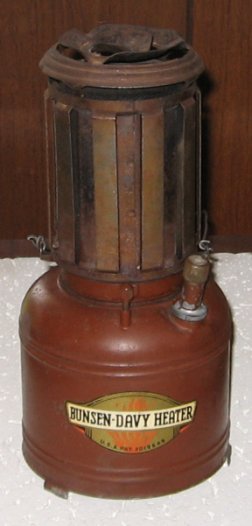
Bunsen-Davy Motor Heater
The Bunsen-Davy Motor Heater operates on an entirely different principle than the Auto Motor Heater above. Rather than using a solid 3/4" diameter wick, the Bunsen-Davy is actually a center draft style quite like an early P&A Royal center draft lamp - it is essentially a center draft lamp with a metal chimney - and uses a 1 1/2" diameter center draft lamp wick! The "chimney" is a strong series of baffles over a sturdy screen. That screen is what makes the Bunsen-Davy safe to use in a relatively confined space without worrying about a plume of heat starting a fire in the engine compartment of a tractor or truck. There is no room in modern car engine compartments for this motor heater, but placed in front of the vehicle in a closed garage it would keep the radiator from freezing at reasonable temperatures. Inserting a new wick in a Bunsen-Davy heater requires patience. Three long "fingers" extend up from a ring around the center draft tube to grab the wick. The rod shown in the center of the photo at right is pulled up to raise the wick: The rod is connected to the ring inside the tank and move up or down with the rod, the "fingers" (sharp points inward) grabbing the wick to match the rod movement. The wick must pass between the draft tube and the ring, and that gets tricky. Long, thin forceps or tweezers can help guide the wick inside the ring so it can extend to the bottom of the tank to pick up fuel. |
|
Bunsen-Davy Motor Heater Instructions (pdf. format you can enlarge for printing) | |
Wick for Bunsen-Davy Motor Heater, | |
Bunsen Sports Heater
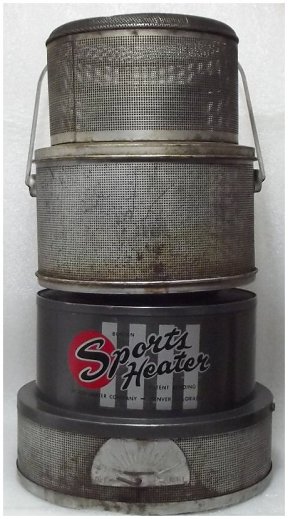
The Bunsen Sports Heater was made by the Sports Heater Co, Denver, CO, in the 1960's and 1970's. The exact date at which production ceased is unknown. In effect, the Bunsen Sports Heater operates using the same combustion principles as a Victorian Era center draft lamp, only done all in metal with multiple safety screens which inhibit areas which would be so hot as to be unsafe. Unlike other Bunsen heaters, no asbestos wicking is used in the Sports Heater. The custom-made wick for the Bunsen Sports Heater is shipped with complete, illustrated installation instructions. |
|
Bunsen Sports Heater Wick, | Order on WickShop.com |